|
|
Post by ginginho on May 23, 2010 11:34:02 GMT 1
Well, I'm about to do my cub in it too. Any tips, did you find it worked well? The main thing I'm wondering is if I should cut out long strips to do it (70cm long for fuselage and 1.3m for wings, or just cut the strips to the width of the section you're doing as shown in NECubFlyer's videos? Now that I think about it, with a 2m roll, I don't think I'd have enough to do it like that anyway, since you need a fair amount of extra film hanging off the ends of the wings to stretch it round with. I've just cut a strip off of it to practice on, and a made a sock for my (mom's) iron. I'm covering a corner of a styrene box, and so far I'm finding it REALLY easy to work with, you can easily see when it sticks because it takes on the texture of the foam. Then after it's all tacked into place nicely, run over it quickly at a higher temperature to reheat the glue to a higher temp and shrink the film, and hey presto, you have an ultra thin layer of high tensile plastic wrapped around your foam :-) Yes it works well. I did mine in strips for two reasons, firstly that I have a two colour scheme and secondly I think it would be very difficult to do the wing in one go. The thing to be aware of is that it sticks to itself very strongly, so any overlaps you have make sure you get them right first time, you will not get a second go at it! The wing tips are the hardest part. Be careful when you are heating it to stretch that you don't over do it as the foam cells will expand leaving a bubbly finish, it's also very hard not to get any wrinkles, Mine has a bit of these as can be seen in the first of these:     These are a bit over-exposed, only proving that the sun does shine in the UK on occasions. ;D The covering will lift off if any flexing occurs, (my wing still bends a bit in a high G maneuver such as pulling sharply out of a dive, even though it's carboned) so be prepared to re-iron it every so often. Hope that helps. Off to charge my packs, glorious day for flying here!  |
|
|
|
Post by Dillzio on May 25, 2010 1:21:55 GMT 1
So far the profilm seems to be going pretty well for me. I start by tacking the sheet down in the right position with the iron on low, and then when everything's in place with no wrinkles I go over it with the iron set to 'synthetic'.
The only problem is that now my plane looks like a gimp wrapped in tight black leather. Some of us get all the luck I suppose.
|
|
|
|
Post by skivit48 on May 25, 2010 1:25:56 GMT 1
I thought you like that stuff?  |
|
N4768Z
Squadron leader
   Flying High Again
Posts: 202
|
Post by N4768Z on May 25, 2010 1:29:16 GMT 1
The only problem is that now my plane looks like a gimp wrapped in tight black leather. Some of us get all the luck I suppose. You should put one of those red ball gag things on the front of the cowling or a zipper... ;D |
|
|
|
Post by Legot on May 25, 2010 2:10:10 GMT 1
So far the profilm seems to be going pretty well for me. I start by tacking the sheet down in the right position with the iron on low, and then when everything's in place with no wrinkles I go over it with the iron set to 'synthetic'. What kind of Iron do YOU have? I've never seen an Iron with words that's not a digital control iron. I thought you like that stuff?  roflmao! |
|
|
|
Post by Dillzio on May 25, 2010 2:36:15 GMT 1
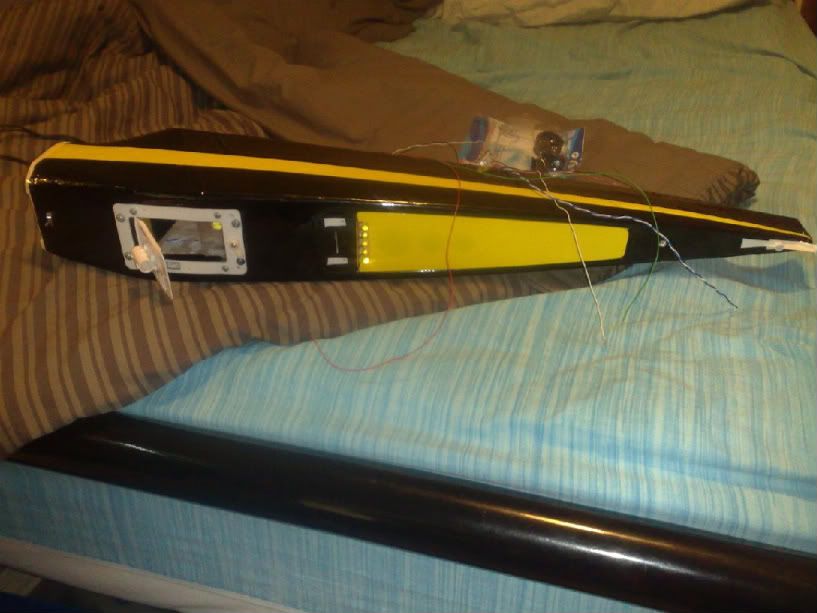
Gentlemen. I give you, the flying gimp.  Also shown in the picture is the iron I used, Mom's iron  I just took and old cotton T-shirt, and cut off a sleeve and some of the material around it. Where it was folded over at the end of the sleeve, I trimmed it to size and ran some elastic through it so I could tie it around the base of the iron. Once that was in place, I pulled it tight at the front, bundled up the slack and tied it with a safety pin. I practiced first on piece of styrofoam to see at what point the foam starts to bubble, warp or burn, and then I practiced applying the film around a corner of the box before I started on the plane. I worked out a good low temperature for tacking down the film and put a mark on the dial. The picture also shows the flashing LEDs i've got in the fuselage. With the two you can see there, it's two LEDs together in series. One is a flashing yellow LED, and the other is a super bright yellow LED. Their powers combined make for some awesome flashing beacons! |
|
|
|
Post by Dillzio on Jun 6, 2010 8:15:08 GMT 1
Here's some pics of the cub-in-progress. I'm still waiting on some servos and other lights to finish the wing, but the fuselage is pretty much done now. It's got two flashing beacon lights on top, one mounts on the top of the tail, the other just behind the wing. It also has a flashing yellow LED underneath the fuselage at the back, a strip of rear facing LEDs behind the battery box that I adapted from a flashing bicycle light. There is also a superbright white LED hooked up to a 555-timer inside the battery box, and a superbright white LED landing light just behind the cowl. I've also ordered some 12cm red, and green LED strips from ebay that I'm planning on mounting either side of the fuselage, under the wings.   |
|
|
|
Post by Legot on Jul 10, 2010 2:54:58 GMT 1
Dill! did you ever get your part's from HK?
|
|
|
|
Post by Dillzio on Jul 10, 2010 6:26:42 GMT 1
Yeah, the plane is all together, all the electronics and navlights are working beautifully, and it's almost ready for it's maiden flight. I just need to attach the ailerons with blenderm, and paint the tail and cowl. Should be finished today :o)
|
|
|
|
Post by Dillzio on Jul 12, 2010 9:32:49 GMT 1
Almost got to take it out for the maiden this evening, put everything together, centered the control surfaces and took it out to the shed for a quick centre of gravity check. Unfortunately, the plane is a bit tail heavy, and in the fading light I didn't have time to add some lead weights to the cowl to correct the balance. Hopefully tomorrow the wind will be as flat as it is right now.
I'll spend tonight adding a few more decals, and I might take a video of the navlights for all my adoring fans :-)
Perhaps I should make up a decal of the Qantus kangaroo? Qantus never crashed, and with my Luke Skywalker figurine at the helm my plane should be just about invincible.
|
|
|
|
Post by john66 on Jul 13, 2010 11:35:11 GMT 1
Good stuff Dill, be great to see some piccies while shes still in one piece  I also look forward to your maiden report. John |
|
|
|
Post by Dillzio on Jul 15, 2010 11:07:51 GMT 1
Hi gang, I've finally compiled the videos for 'my new cub', which is yet to receive it's official name. The only thing I'm yet to do to finish it off is attach the aluminum landing gear struts, which I've painted yellow, and add some yellow decals to the cowl.
This is the first video in the series to show off my awesome new brushless super cub, yet to be taken for it's maiden flight. This video mainly focuses on the decals, ailerons and flaps.
This video basically illustrates where I sourced my navigation lights from.
This section shows how the navlights look at night, and has half of the video showing the cub's internal electronics.
This final video in the series contains the rest of the clip showing the cub's internal electronics, and finishes with some closing credits and acknowledgments - a must see for all super cub club members :o)
enjoy!
|
|
|
|
Post by killioughtta on Jul 15, 2010 15:41:50 GMT 1
What a beautiful Cub! Great job with the covering! Is that MonoKote? You have yourself one of the best-looking and most intricate Super Cubs there are.
|
|
|
|
Post by Dillzio on Jul 15, 2010 15:50:13 GMT 1
Thanks heaps Erwin, following your review I'm grinning from ear to ear  It's coated in profilm (aka ultracote), and the yellow decals are stick on (not iron on), um, I think it was called solartrim. I hope you appreciated your mention in the acknowledgments :-) |
|
|
|
Post by ginginho on Jul 15, 2010 16:03:09 GMT 1
A tidy looking cub indeed, well done Dillz. Not sure about the nickname you gave me though, but in the spirit of it, here's a couple of observations:
1) How much heat does all the stuff within the body generate? I ask as you've covered the air release holes (on the strip underneath behind the battery box). You may want to check that it doesn't get too hot in there.
2) Put some profilm over the blenderm hinges, it'll look cleaner.
3) I can't remember the name of the stuff, but you can buy rolls of "pinstripes" (various widths from 0.5mm to upto about 6mm on one roll). I think you'd finish off the covering job very nicely with a bit of this stuff (in yellow) stuck to the black either side of the side stripes. It's the stuff I did the red piping on mine and personally I think it sharpens up the whole package.
|
|


