Post by Dillzio on Nov 1, 2011 11:48:15 GMT 1
Hey gang, I'm working on the wing for the new cub, and thought I'd share with you how I've done the ailerons and flaps, they've come out beautifully!
First of all, the measurements:
flaps start 1cm from the plastic saddle, even with the saddle removed you can easily see the indentations in the foam. The flaps + ailerons are 41cm. 23cm for the ailerons and 18cm for the flaps. The depth of the ailerons, when measured along the top, is 5.2cm. To start with, just cut out a big 41cm aileron, and cut it at the end to separate it into flaps and ailerons.
I hinge my ailerons on the top with tape, so a wedge needs to be cut out of the foam to allow the ailerons to swing downwards.The wing is about 19mm thick along the cut. If you flip over the aileron so it's upside down, measure and draw out a line 15mm back from the edge you just cut. You then tape a ruler to the wing along this line to use it as a guide, and cut on an angle between the ruler, and the 'top' side of the edge you just cut. Start by cutting to about 5mm away from the edge, then just whittle away at the foam until you get it just perfect. Once you cut foam away, you can't put it back, so take your time and cut it away just a little at a time.
With a cut 15mm back from the tip of the wing, that will give you 38 degrees of movement. To get a bit more, I cut a wedge out of the ailerons as well. You can't cut as far back with the ailerons, because you need to have the control horns far forwards to get good movement. For this reason, when you cut the wedge out of the ailerons you cut along a line that's only 6mm back. This extra wedge gets you another 17 degrees of movement, bound to come in handy for when you want to slam those flaps down HARD.
At about this point I cut them into separate ailerons and flaps. My last ailerons were 25cm wide and they gave the cub way more roll than it needed, so I've got no worries with making them only 23cm this time for the sake of bigger flaps. My first flaps were 15cm wide and while they worked, bigger would have been better.
Finally, get a small, flat piece of wood with some 220 grid sandpaper on it, and flatten out all the edges you just cut, get rid of all the bumps and ripples from the carving. You now have some kick arse ailerons and flaps that just need to be attached to the wing with tape or profilm.
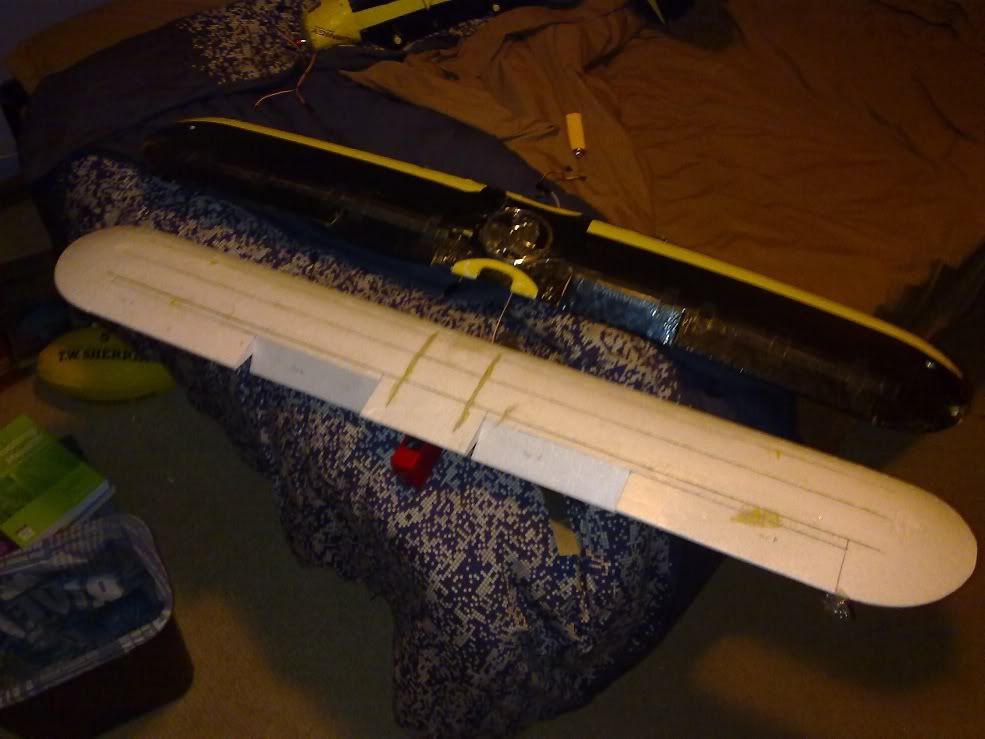
Here are my ailerons with all the cuts finished. The brown patches are gorilla glue. You won't see any of that stuff when it's covered in profilm. If you have a good eye, you may see that my original cub's ailerons were only 40 cm long, and went 1cm closer to the wingtips.

If you want to see how I did the carbon fibre and flattened it out, check out this thread here: supercubclub.proboards.com/index.cgi?board=tt&action=display&thread=4296
First of all, the measurements:
flaps start 1cm from the plastic saddle, even with the saddle removed you can easily see the indentations in the foam. The flaps + ailerons are 41cm. 23cm for the ailerons and 18cm for the flaps. The depth of the ailerons, when measured along the top, is 5.2cm. To start with, just cut out a big 41cm aileron, and cut it at the end to separate it into flaps and ailerons.
I hinge my ailerons on the top with tape, so a wedge needs to be cut out of the foam to allow the ailerons to swing downwards.The wing is about 19mm thick along the cut. If you flip over the aileron so it's upside down, measure and draw out a line 15mm back from the edge you just cut. You then tape a ruler to the wing along this line to use it as a guide, and cut on an angle between the ruler, and the 'top' side of the edge you just cut. Start by cutting to about 5mm away from the edge, then just whittle away at the foam until you get it just perfect. Once you cut foam away, you can't put it back, so take your time and cut it away just a little at a time.
With a cut 15mm back from the tip of the wing, that will give you 38 degrees of movement. To get a bit more, I cut a wedge out of the ailerons as well. You can't cut as far back with the ailerons, because you need to have the control horns far forwards to get good movement. For this reason, when you cut the wedge out of the ailerons you cut along a line that's only 6mm back. This extra wedge gets you another 17 degrees of movement, bound to come in handy for when you want to slam those flaps down HARD.
At about this point I cut them into separate ailerons and flaps. My last ailerons were 25cm wide and they gave the cub way more roll than it needed, so I've got no worries with making them only 23cm this time for the sake of bigger flaps. My first flaps were 15cm wide and while they worked, bigger would have been better.
Finally, get a small, flat piece of wood with some 220 grid sandpaper on it, and flatten out all the edges you just cut, get rid of all the bumps and ripples from the carving. You now have some kick arse ailerons and flaps that just need to be attached to the wing with tape or profilm.
Here are my ailerons with all the cuts finished. The brown patches are gorilla glue. You won't see any of that stuff when it's covered in profilm. If you have a good eye, you may see that my original cub's ailerons were only 40 cm long, and went 1cm closer to the wingtips.

If you want to see how I did the carbon fibre and flattened it out, check out this thread here: supercubclub.proboards.com/index.cgi?board=tt&action=display&thread=4296

