swimmer
Flight lieutenant
 
Posts: 95
|
Post by swimmer on Jun 28, 2008 4:01:45 GMT 1
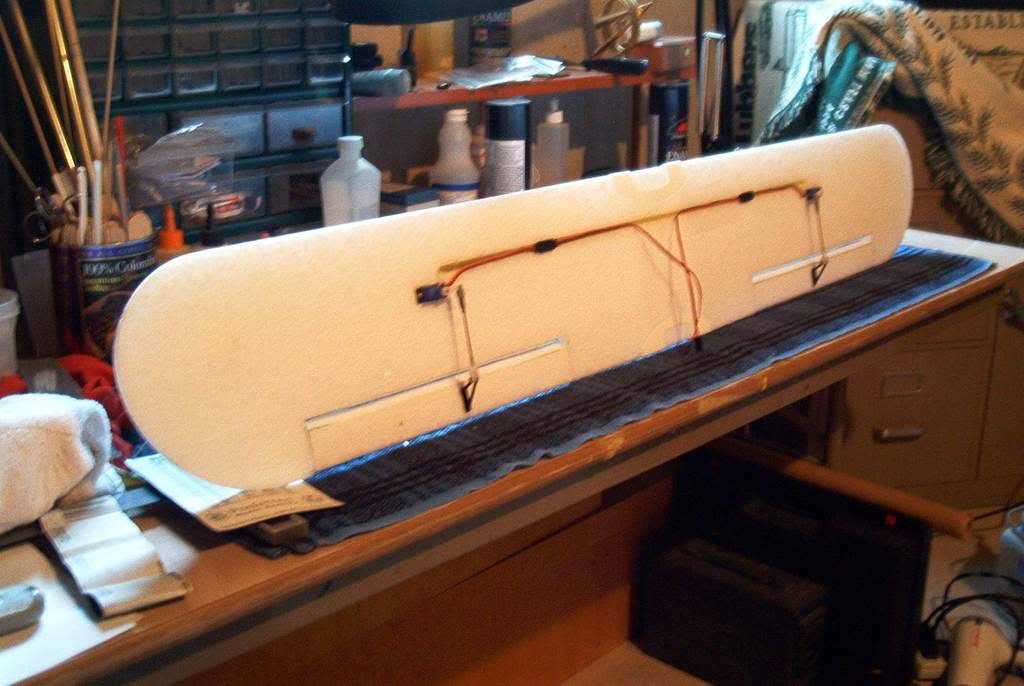
Completed the alieron mod on my SC today. I've got to say this is the most time consuming and difficult mod I've made to this point and even more work than replacing all electronics. I've worked on it every day this week completing it late afternoon today. I know I am somewhat anal about fit and finish so that may be the reason it took me so long, but, that is just me.
I got to fly her this evening in light wind conditions, 7-10mph, and she flew beautifully. The DX6i did a great job of giving her every minute command I asked for. The ailerons make the SC very responsive and the turns are sure and sharp. I did not hotdog it but I can tell it is just waiting to do rolls and loops. Moving the rudder control back to the left stick with the aileron control on the right presented no problem. It was worth the time spent adding the ailerons. If you chose to do this mod, really read and study all the alieron mod posts here and on other forums. It is not an easy or quick mod.
I programmed the DX6i for dual ailierons choosing not to use a "Y" harness. I did not lay the servos on their sides but chose to set them upright. The servos do not bind or have any difficulty operating the ailerons. Doing it this way gives me access to the servo arm screws. Either way is fine, I just chose to do it this way. I also used craft sticks embedded in the wing foam to screw the servos to making them easily removable yet providing a very strong mount.
I'll post a picture if I can figure out how to do it.
Swimmer
|
|
swimmer
Flight lieutenant
 
Posts: 95
|
Post by swimmer on Jun 28, 2008 4:12:59 GMT 1
 See if this works. Picture is a little big. Swimmer |
|
swimmer
Flight lieutenant
 
Posts: 95
|
Post by swimmer on Jun 28, 2008 4:14:39 GMT 1
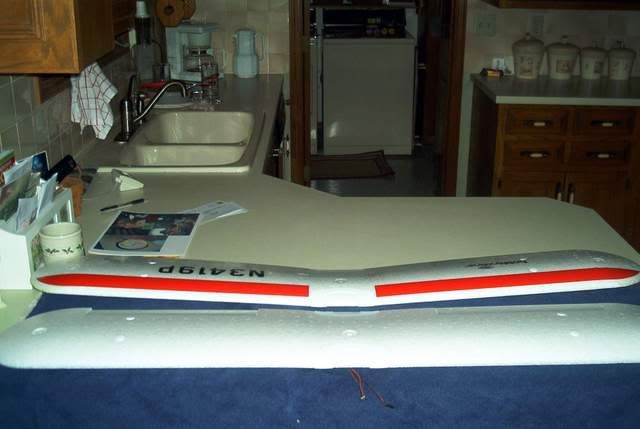
I also was able to remove most of the dihedral and added a CF rod to maintain the non-dihedral in the wing.
Swimmer
|
|
|
|
Post by SCC on Jun 28, 2008 8:26:32 GMT 1
Nice job Swimmer. Very neat and tidy. Any chance of a vid to see how she performs.  |
|
swimmer
Flight lieutenant
 
Posts: 95
|
Post by swimmer on Jun 28, 2008 15:40:42 GMT 1
SCC, I do not have a video camera but will see if there is any of my friends who do. One thing, among many, I do like is with the CF rod imbedded in the wing I no longer need struts. In the picture you can see how much dihedral was removed. Swimmer  |
|
|
|
Post by SCC on Jun 28, 2008 19:37:36 GMT 1
Hi Swimmer. I wish i had taken out the dihedral when i did my aileron upgrade many moons ago.  You have got me thinking about dragging it out of storage and putting life back in my SC  Trouble is i'm having a good time flying my warbirds. |
|
|
|
Post by flyinghigh on Jun 28, 2008 21:55:14 GMT 1
Very clean! What size CF rod did you use, and how did you keep the wing flat when it was drying?
|
|
swimmer
Flight lieutenant
 
Posts: 95
|
Post by swimmer on Jun 28, 2008 23:12:00 GMT 1
flyinghigh,
To remove the dihedral I found a plastic paint can that had some paint left over from a job we did some time ago. The paint and can weighs 5-6 pounds. Over a couple days from time to time I heated the wing saddle with a standard 1600w blow drier then cover the area with a towel to insulate. I had the wing laid on a towel folded the long way and then rolled up twice on each end. I sat the wing on the towel with the towel roll about 8 inches from each wing tip and set the paint can on the wing saddle. This would invert the dihedral. After a couple days most of the dihedral was gone.
The CF rod is 1/4" x 24". I used a metal straight edge situated evenly from the leading edge and taped it to the wing so it would not move. I then ran my soldering iron along the straight edge allowing the hot tip to melt the foam about 3/8" deep. If you do this be sure to keep the soldering iron moving. The slot was a perfect size and actually the rod snapped into the groove. I removed it, ran some 15 minute epoxy into the slot and placed the CF rod into the slot seating it into the epoxy. I then poured more epoxy on top of the rod in the slot to cover it. I did not fill the slot completely to allow the servo extensions a place to run to the electronics bay. I covered the servo extensions with clear packing tape. While doing this I sat the paint can on the wing saddle far enough toward the trailing edge to hold the shape. I let it cure and the wing had little, if any, spring back.
Swimmer
|
|
sayers
Flight lieutenant
 
Posts: 81
|
Post by sayers on Jun 29, 2008 1:01:04 GMT 1
Swimmer, Very nice lookin mod.
Jerry
|
|
|
|
Post by flyinghigh on Jun 29, 2008 1:45:38 GMT 1
Thanks swimmer, I'll have to try that.
|
|
swimmer
Flight lieutenant
 
Posts: 95
|
Post by swimmer on Jun 29, 2008 3:43:38 GMT 1
Thanks, Jerry. flydiver, I used a lot of the information from this website plus the pictures are good. One difference is mine are 1.75" and those in the pictures are 1.5". The only reason I made them wider is I felt they would be more substantial to work with, and they were. Search all resources before you start, read and ask a lot of questions. www.rcgroups.com/forums/showthread.php?t=871134Allan |
|
|
|
Post by flyinghigh on Jun 29, 2008 23:03:18 GMT 1
I was looking around at CF and did you use a rod, or a tube? Do you think a 1/4 tube will be strong enough to hold the wing?
Is there a major difference in strenght between rods and tubes?
|
|
swimmer
Flight lieutenant
 
Posts: 95
|
Post by swimmer on Jun 30, 2008 12:42:33 GMT 1
I used a rod. Difference in strength? I don't kow but the rod is doing a nice job holding the wing where I want it.
|
|
|
|
Post by joseywales on Jul 1, 2008 21:52:36 GMT 1
I just joined the aileron club as well. It really makes the plane a lot more fun. It's not really that hard to do, it just takes some time. Make sure when you cut the ailerons you cut from the top side of the wing. I say this because when cutting foam any tearing or gouging tends to take place on the side where the blade is exiting the foam. So it you cut from the top side, and Forrest Gump one of your cuts and tear the foam a bit...you won't see it as much if it's on the bottom of the wing. (I learned this the stupid way!) Also make sure the blade is perfectly up and down, not angled as you cut.
I flattened the wing by flipping it upside down and laying it across a large open box. I placed some books in the middle of the wing so it bent actually beyond the point of being flat. I let it sit for a day then applied an almost wing long length of Heavy Duty 3M strapping tape (like clear packing tape but reinforced with nylon strips) to the bottom of the wing while most the weight was on it. It flattened it out perfectly. And remains flat over a week later.
I was thinking of slapping a CF rod or bamboo skewer in the wing and going strutless but I've read some posts where a couple guys did this and snapped the rubber bands in flight. No struts means the rubber bands are taking the full wing load. Probably not a big deal if you keep good tabs on your rubber band strength though.
|
|
|
|
Post by joseywales on Jul 1, 2008 22:19:25 GMT 1
When I say not angled I mean not angled or "tilted" left or right while you cut. You DO want to make the actual cut with the utility knife blade extended 3 inches or more and angled as you cut (not punching it up and down perpendicular to the wing)
Also, a dremel with a grinding blade works great for gouging out the server nests in the wing.
|
|


