Post by Dillzio on Oct 5, 2011 13:10:01 GMT 1
Hi gang. The old cub's become a bit of tank over time due to various repairs, so I've decided to rebuild it better than ever.
First step of my project is doing the wing (since I have to wait for them to order in the fuselage). I've just flattened out my wing, and it's worked so well I just had to take some pics and share it with you guys.
I have used 3x carbon fibre spars in my wing, about 3/4mm by 3mm by 1m long. Installation is easy because all you have to do is put a cut in the foam, then push the spars into the groove. The carbon fibre spars not only keep the wing flat, and make it stronger, but they eliminate the need for those pesky wing struts as well.
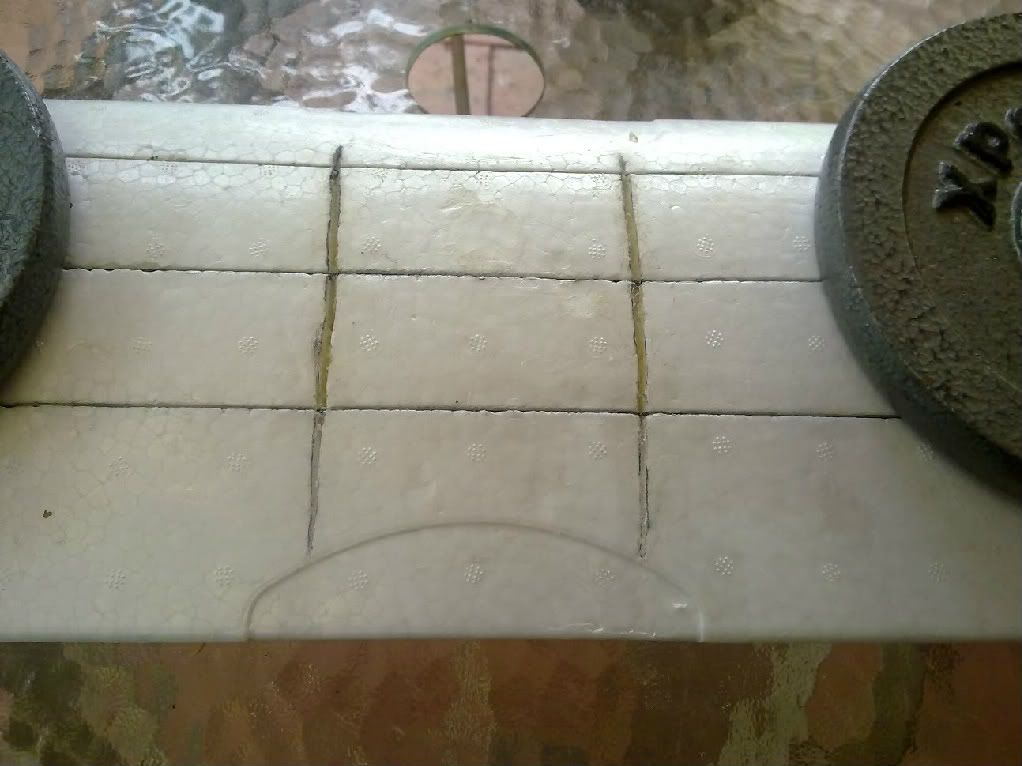
To take the angle out of the wing, you need to cut it in the places shown in the first picture, otherwise the middle of the wing will keep the dihedral, you'll flatten out the rest of the wing to compensate, and your wings will be bowed just like they were on my last cub. The cuts I did went about 3/4 of the way through the wing (at its thickest point). You can see where the angle in the foam changes (either side of the saddle), but from some angles in some lighting conditions it can be difficult to see. For this reason I recommend marking it out first with a fine texta before doing the cuts.
Next you need to draw some lines along the wing to mark out where the carbon will go. Start by measuring back from the leading edge and put a few dots all along the wing to mark out where the line will be. I then used one of the carbon spars as a ruler to join the dots. Then you do the same thing on the trailing edge (I did mine 6cm back to allow 5cm for ailerons), then make a parallel line in between the two.
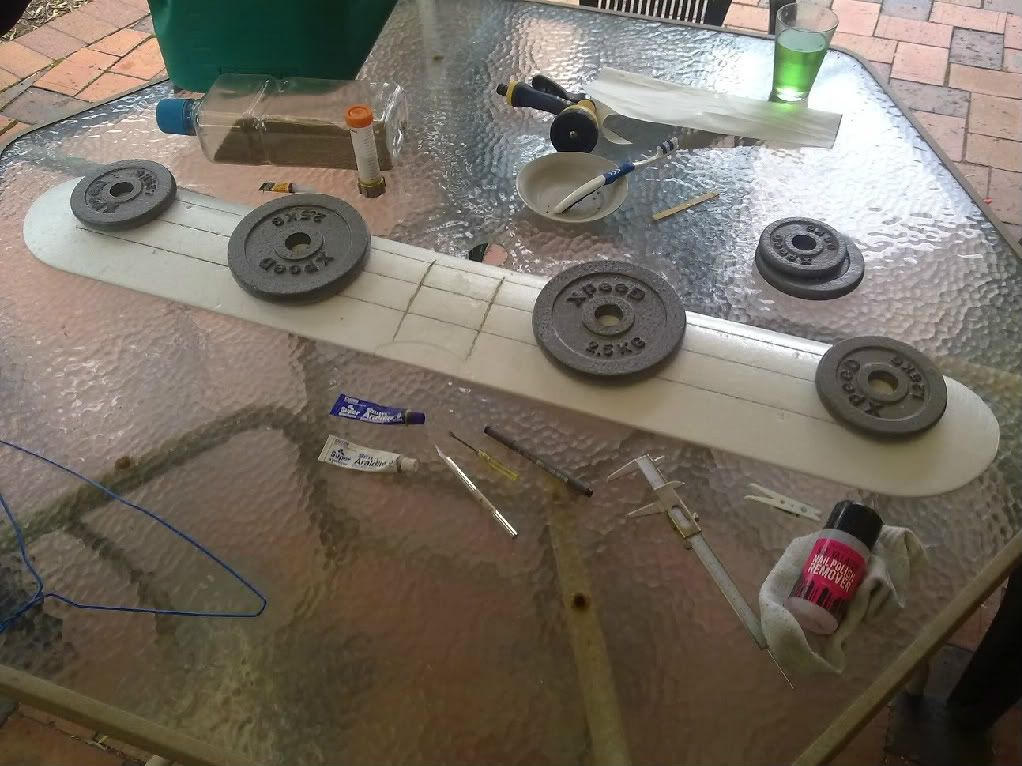
After the lines are drawn you very slowly and carefully cut along the lines, taking care to keep the blade vertical the whole time, about 1cm deep. I recommend doing a relatively shallow cut first, then go over it again to make it deeper. Doing a deep cut to start with makes it harder to follow the line perfectly. After the cuts are in, take a little flat head screwdriver (like the one pictured) and run it along the cuts to open the grooves up a bit, otherwise getting the rods into it will be a nightmare. Next you want to insert all the rods into the grooves (not too deep, you do want to get them out again) and leave them there at least 5 mins to stretch the foam out a little.
You then mix up some slow setting epoxy on a piece of wax paper - I used some wax paper that my profilm came stuck to. Otherwise, greeseproof/butchers paper works OK too. You then basically make a 'taco' out of the paper, and slowly drag each spar through the epoxy. You basically want to drag each spar through the pooled epoxy, gently pinch it with your fingers (through the paper) and slowly pull it through to remove all the excess epoxy. As each spar is coated in epoxy, immediately push it down into the groove. While you do this step, you just want weights on the wing tips to hold the wing relatively flat. I recommend using the screwdriver to push each spar down so it's 2-3mm below the surface.
As soon as all the spars are in, and the excess epoxy is wiped up with some acetone on a rag, you want to put the weights on the wing close to the middle, and close to the tips in order to make sure the wing is perfectly flat. Further to this, the wing is only going to end up as flat as the surface you make it on - for this reason I recommend making it on a table that is perfectly flat, glass is ideal. At this stage, I also put some spare epoxy down into two grooves I cut into the centre of the wing for strength. I'd recommend against filling the whole groves with epoxy because it's too heavy.
After the epoxy has set (18 hours) run a very small bead of medium CA glue (remember not too much, you want to keep things lightweight) along the seams of each carbon rod for additional strength. I also ran a fairly thick bead of medium ca along the 2 grooves in the centre of the wing, allowing it to dribble down and soak into the foam to make it harder/stronger and to fill in some of the gaps in the epoxy, which had started to set by the time I pushed it down into the groove.
Finally, the two grooves just need to be filled in with a lightweight filler. Gorilla glue is ideal because it foams up and expands when mixed with a little water, making for a lightweight yet strong gap filler. I'm in Australia, so i've had to order my gorilla glue from overseas, waiting on it now. Other than that, I think expanding foam would work well, or otherwise put a piece of thin fibreglass over the top of each groove perfectly flat, and stick it down with medium CA. I think filling the groove with something lightweight and adsorbent, like cotton wool or cigarette filters, then running a thick bead of med ca along it and allowed it to soak in would probably work well too.
Tutorial complete, enjoy!


