Post by skivit48 on Apr 26, 2010 21:03:43 GMT 1
After completing my new workbench and getting my work area set up I was ready to get my cub modded and upgraded to LiPo's. After watching Necubflyer's videos on youtube and reading many posts on here as well as wattflyer, and rcgroups, I came up with what I wanted to do. I drew from other people's mods and added my own interpretations to the mix.
For the battery box I prepped it pretty close to the way Necubflyer did. I added a piece of pink foam insulation to the top of the box w/ some epoxy to make for a more snug fit with the battery. You can also see some more pink foam in the box toward the front to take up the gap that was left by leaving some plastic intact for strength where the landing gear goes fits in. For the piece in the front I epoxied a very thin piece of basswood sheet trimmed to fit. That came in a multi-pack of basswood blocks, strips, all different sizes of pieces that I picked up from "Michael's". I figured it might add a little bit of strength to the box and it gave me a better fit with the foam for the battery. After that set, I roughed up the inside of the box and the wood side of my insert and epoxied that in, and trimmed out the corners to allow for more airflow.


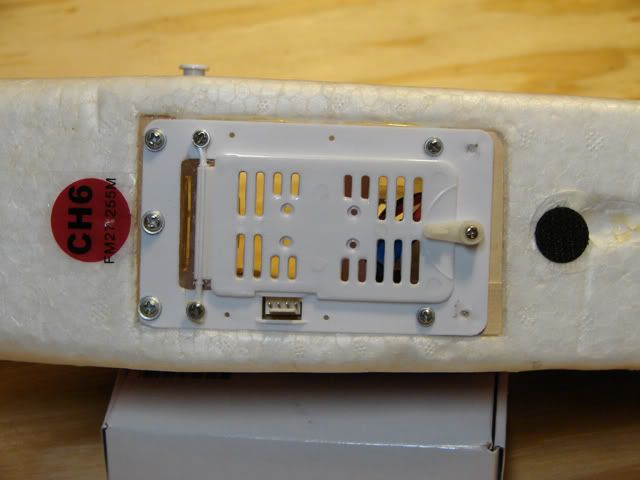
I then did the Popsicle stick mod on the bottom. (also very much like Necubflyer did) and remounted the battery box in the fuselage. This is when I mounted the x-port back in which I am keeping until I upgrade to a better and more standard radio system.

I haven added screws to the rear portion of the box cover yet, as I haven't decided on how my struts will be attached. I have looked at doing a quick connect/disconnect with paper clips. I like what Britpilot did with the rivnuts too.
supercubclub.proboards.com/index.cgi?board=tt&action=display&thread=2699
I have even thought about trying to use magnets to do the job, but not sure I would trust them.
It was then on to the electronics.
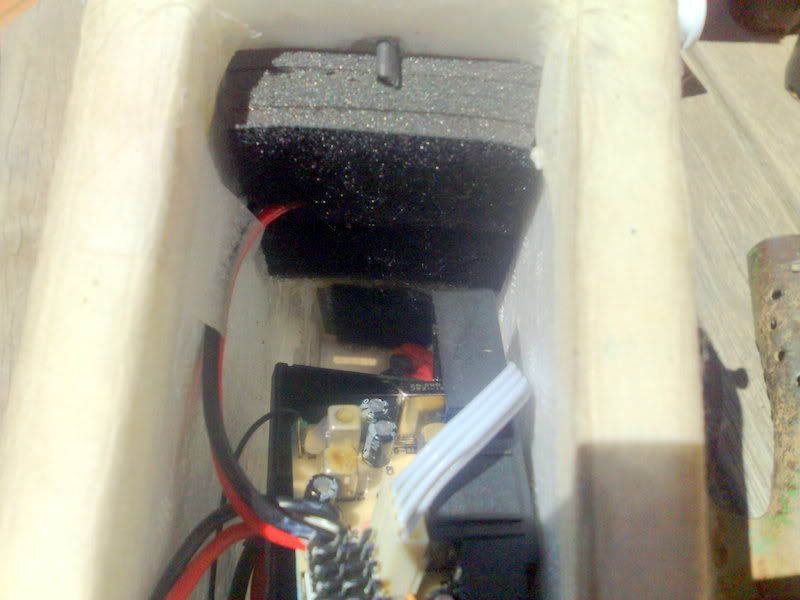
I pulled the jumper on the esc/recv and installed an EC3 connector. I used some Velcro to side mount the esc/recv . I chose Velcro because I would rather have the option of removing it if needed. I melted out some foam where the motor leads come through the firewall so I could spread them out for the battery to go between them. I also took another small piece of foam insulation with 2 toothpick pieces epoxied in it to put in the firewall to keep the battery from tipping forward in flight.
I did not epoxy into the firewall so that that piece of foam could be replaced if necessary. I also cut a small strip of basswood and epoxied that into little recesses I cut out in the fuselage to prevent the battery from shifting up during flight.
There is a small piece of plastic twist tie connected to the servo leads and x-port wire to keep the leads free of the servo arms.

Here is everything all finished inside.
I tried to do the Popsicle stick mod for the wing saddle, and completed it. Unfortunately I used too much white gorilla glue and when it dried and cured the stick was nowhere close to being level and straight. I took a hobby/razor saw to remove the stick and surrounding foam so I could fix it. I decided to use the ole' pink foam to replace what I had removed and instead of using another stick I went with a cut to fit piece of plastic cutting board from the "Dollar Tree" that is double side taped to the pink saddle.I took a piece of hollow plastic tube and ran it through the fuselage for my antenna to run through, before I mounted the replacement piece from my mistake with 2 toothpicks and a little less gorilla glue.
I put a piece of clear 3M packing tape over the new foam and part of the rear fuselage. I put the packing tape over the front saddle to help protect that too. I also am leaving open the holes where the ACT sensors used to be to allow for more airflow inside.
That's where I'm at so far. Everything is coming together bit by bit and will be finished up completely soon.
I am open to suggestions for connecting my struts. Any thoughts on the magnets?
I'm not quite sure how I will do the "paint" scheme yet. I don't think I am going to paint it. Rather may just put on some new decals or maybe a couple custom ones.
I know this was a long post. (hands numb)
Also thanks in advance for any input, comments and advice.
Skivit
For the battery box I prepped it pretty close to the way Necubflyer did. I added a piece of pink foam insulation to the top of the box w/ some epoxy to make for a more snug fit with the battery. You can also see some more pink foam in the box toward the front to take up the gap that was left by leaving some plastic intact for strength where the landing gear goes fits in. For the piece in the front I epoxied a very thin piece of basswood sheet trimmed to fit. That came in a multi-pack of basswood blocks, strips, all different sizes of pieces that I picked up from "Michael's". I figured it might add a little bit of strength to the box and it gave me a better fit with the foam for the battery. After that set, I roughed up the inside of the box and the wood side of my insert and epoxied that in, and trimmed out the corners to allow for more airflow.


I then did the Popsicle stick mod on the bottom. (also very much like Necubflyer did) and remounted the battery box in the fuselage. This is when I mounted the x-port back in which I am keeping until I upgrade to a better and more standard radio system.

I haven added screws to the rear portion of the box cover yet, as I haven't decided on how my struts will be attached. I have looked at doing a quick connect/disconnect with paper clips. I like what Britpilot did with the rivnuts too.
supercubclub.proboards.com/index.cgi?board=tt&action=display&thread=2699
I have even thought about trying to use magnets to do the job, but not sure I would trust them.

It was then on to the electronics.
I pulled the jumper on the esc/recv and installed an EC3 connector. I used some Velcro to side mount the esc/recv . I chose Velcro because I would rather have the option of removing it if needed.
 I melted out some foam where the motor leads come through the firewall so I could spread them out for the battery to go between them. I also took another small piece of foam insulation with 2 toothpick pieces epoxied in it to put in the firewall to keep the battery from tipping forward in flight.
 I did not epoxy into the firewall so that that piece of foam could be replaced if necessary. I also cut a small strip of basswood and epoxied that into little recesses I cut out in the fuselage to prevent the battery from shifting up during flight.
There is a small piece of plastic twist tie connected to the servo leads and x-port wire to keep the leads free of the servo arms.

Here is everything all finished inside.
I tried to do the Popsicle stick mod for the wing saddle, and completed it. Unfortunately I used too much white gorilla glue and when it dried and cured the stick was nowhere close to being level and straight. I took a hobby/razor saw to remove the stick and surrounding foam so I could fix it. I decided to use the ole' pink foam to replace what I had removed and instead of using another stick I went with a cut to fit piece of plastic cutting board from the "Dollar Tree" that is double side taped to the pink saddle.I took a piece of hollow plastic tube and ran it through the fuselage for my antenna to run through, before I mounted the replacement piece from my mistake with 2 toothpicks and a little less gorilla glue.

I put a piece of clear 3M packing tape over the new foam and part of the rear fuselage. I put the packing tape over the front saddle to help protect that too. I also am leaving open the holes where the ACT sensors used to be to allow for more airflow inside.
That's where I'm at so far. Everything is coming together bit by bit and will be finished up completely soon.
I am open to suggestions for connecting my struts. Any thoughts on the magnets?
I'm not quite sure how I will do the "paint" scheme yet. I don't think I am going to paint it. Rather may just put on some new decals or maybe a couple custom ones.
I know this was a long post. (hands numb)

Also thanks in advance for any input, comments and advice.
Skivit


